Saturday, April 30, 2011

Turn Around, Bright Eyes

So, with our initial goal accomplished, you'd think we'd sit back and relax.  But, we aren't in the college (too real?), so, after several Monster/RockStar/MTN DEW fueled all nighters, so we've been busting our butts to try and add another behavior.  And, we're proud to say, we have.  RHexBox (that's what we're thinking of calling it now) now not only follows a person as they walk away from it.  But, now it will also move backwards as you walk towards it.  That's all well and good, but the big Kahuna is turning, and we've got it.  That's right, RHex will follow a person as they turn.

How does that work?  Well, when we started, we had code that determined where the exact center pixel of the Kinect's field of vision was, and then returned the z-value of that pixel.  This data was then processed on the BeagleBoard, and converted in to Dynamism commands, which were then transmitted to the robot via Ethernet. With this code, we were able to have the robot follow a person as they traveled in a straight line, and stayed in the center of the Kinect's vision.  This was no small undertaking, but it wasn't very exciting.  So, we decided to add turning.

To do this, we broke the screen in to a grid.  We then checked z-data in each block of the grid.  The z-value that was smallest represented the closest object to the robot.  Since we were operating in an obstacle-free environment, this closest object would be the person we were tracking.  Based upon which grid had the smallest z-value, we were able to tell where the person was relative to the robot.  The robot was then told to turn towards that person, and continue to follow them, both backwards and forwards.  The robot remembers the direction that the person is moving in.  So, if you are in the left part of the robot's field of vision, and you move to its right field of vision, and then out of its field of vision, the robot figures that you have moved to its right, and thus continues to move right until it finds you again.

With this code, we have been able to implement the following behaviors:

  1. Straight lines forwards
    • Follow a person as they walk straight away from a person
  2. Straight lines backwards
    • The robot walks backwards as they walk towards it
  3. Forward turning
    • Follow the person as they walk away and turn to the left or right
  4. Backward turning
    • As the person walks toward the robot, they turn, and the robot walks backwards, turning in the opposite direction so that they keep the person in the center of their field of vision
  5. Three-Point turning
    • You remember the K-Turn from driver's ed, right?  This behavior is a good way to turn the robot around
  6. Serpentine/slalom
    • The robot tracks a person as they travel in an S path
  7. Circle in place
    • The person maintains a fixed distance from the robot, and walks around them in a circle.  The robot circles in place so that it continues to face the person.
  8. Target Switching
    • Two people walk next to each other, one peels off, and the robot tracks the other.
We've got some great footage that we're going to edit together after finals, but here is a quick video just for LOLzzz.


Tuesday, April 26, 2011

Base Goal... Accomplished

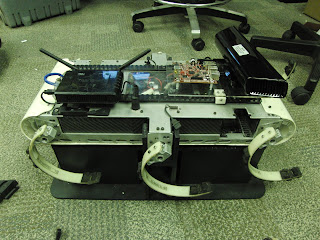
After many late nights, WaWa runs, and several robot-kicking-human-incidents, we've finally managed to accomplish our base goal of having the robot follow a human being in a straight path at a fixed distance.  Video proof of this is soon to follow, we promise, but below we have some pictures of our completed rigs, including several cables that we built ourselves.  Enjoy!

Below is a picture of our rig.  The Kinect is screwed on to a piece of laser-cut acrylic.  The BeagleBoard is attached via standoffs.  You can see many of the cables we made ourselves, including a custom connector to run the BeagleBoard off of the robot's 5V power supply and the connector to run the Kinect off the robot's 12V power supply.  Also, we modified the cable that connects to the Kinect itself.  it now has a standard female connector on one end.  We modified the standard cable that plugs in to the wall so that it now terminates in a standard male connector.  This makes it easy to switch between powering the Kinect off the robot and powering it from the wall.


Below is a picture of our rig from head on:


And, below are a few more pictures of the rig on the robot:


Sunday, April 17, 2011

Formatting Ubuntu on SD Card and First Mount Prototype

Today we once again used the divide and conquer technique to get some good work done.  Matt worked on further formatting of the SD card that will be running Ubuntu on our Beagleboard, while Tim made a few mount prototypes from various materials.

Matt's work on the BeagleBoard accomplished the following.  First and foremost, Ubuntu is now installed and running.  Matt also configured the BeagleBoard for SEAS-NET so that the board can access the internet, something that will be crucial for further configurations.  Next, Matt installed all of the dependencies for Dynamism.  Dynamism is the software platform used to control the RHex robots.  Also, all of the necessary dependencies for the Kinect libraries were installed on the board.  Thus, the next logical steps are to install the actual Dynamism software and the actual Kinect libraries (but the groundwork is laid for this next step).

Tim's work involved inhaling a lot of fumes.  He laser-cut two different prototypes of the mount, one from black ABS plastic, and one from clear acrylic.  The clear acrylic mount came out nicer, so we decided to go with that one.  This first prototype is just a simple plate with the necessary mounting holes cut in it.  Future work will involve adding on an enclosure for the BeagleBoard, adding on some fancy etchings, and further bells and whistles.  But, as of now, we have a perfectly good test platform mounted on our robot, as you can see in the pictures below.


We're happy with our progress so far, and excited to continue plowing ahead.

Thursday, April 14, 2011

SD Cards and SolidWorks FTW

While others might be out getting flung, we were in the Kod Lab.  Sad?  NO.  Awesome, YES.  Today, we ran over to the bookstore and purchased a 4GB Micro SD card for just $9!  With our shopping done for the day, we headed to the Kod Lab to divide and conquer.  Matt set to work formatting the SD card to run Ubuntu on the Beagle Board.  After learning a few ways NOT to configure the SD card, Matt was able to create a boot partition on the card.  While Matt did that, Tim worked on designing a simple platform to hold the Kinect and Beagle Board.  This involved sitting with a pair of calipers and determining the dimensions between the various holes that needed to be added to the platform.  Below is a screenshot of what the finished platform looks like.  It will be cut out of 1/8" ABS Plastic.


Tomorrow is Friday (yesterday was Wednesday, Saturday comes afterwards), and we plan on laser-cutting out our platform and continuing to configure the Beagle Board.

Bench Mark Reached: Tracking in X, Y, and Z

Staying true to ourselves and our past performance, the solution to incorporate z data was incredibly simple, and we just missed it.  Basically, just as before for x and y there were the variables pt[0].X and pt[0].Y that stored the values of the x and y components of the center of mass of the person being tracked, there is a variable pt[0].Z that stores the value of the z component of the center of mass.  Thus, with some code shuffling, we get the below output:


And thus, we now have working code that tracks the x, y, and z data for the center of mass of a human being.  From here, we will work on making the code even lighter so that it can run efficiently on the BeagleBoard, as well as creating a physical platform to hold the Kinect and BeagleBoard when we attach it to the RHex robot.

Sunday, April 10, 2011

X, Y, and Z (Now, to put it all together)

Today, we spent a good solid 12 hours in Detkin working to accomplish our next goal, getting the x, y, and z position for the geometric center of mass of a human being.  Yesterday, we were able to get the OpenNI software to draw a "skeleton" onto a human being, that included an X on their geometric center.  Thus, we decided to try and build upon this.

First, we had to make sure we understood the OpenNI code, which, is no small feat since the code is not commented, and there is no documentation for it.  Using the tried and true method of commenting out code,  re-making everything, and seeing what happens, we were able to figure out how the code works.

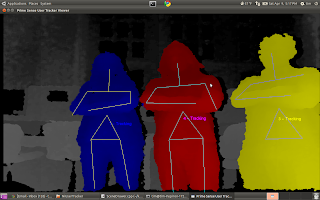
What was most helpful was commenting out the various functions that that actually draw the skeleton, and then seeing how the image changed.  One image from this process is shown below.  Notice how the torsos have only triangles, and not X's.  This is because we commented out the code that drew lines from the shoulder to the geometric center of mass (GCOM).  


We came to find that the variable XN_SKEL_TORSO is used to store the position data for the geometric center of mass.  We then commented out all the drawing code, and added in this line:

DrawLimb(aUsers[i], XN_SKEL_TORSO, XN_SKEL_HEAD);

Thus, from here on out, instead of drawing a skeleton, we will draw a single line from the head to the center of the torso.

Now, we knew how the code draws a line from the head to the GCOM, but we didn't know how the code found where the head and GCOM were located.  Further perusal of the code yielded the following:

XnSkeletonJointPosition joint1, joint2; //skeleton joint position objects
g_UserGenerator.GetSkeletonCap().GetSkeletonJointPosition(player, eJoint1, joint1); //reads position of player's first joint (eJoint1), store as joint1
g_UserGenerator.GetSkeletonCap().GetSkeletonJointPosition(player, eJoint2, joint2); //reads position of player's second joint (eJoint2), store as joint2

This code reads in the position of various joints, and then stores their location to the variable joint1,2, etc.

The below code takes the data from joint1, etc, and breaks it into x and y components that are stored in x and y arrays.

XnPoint3D pt[2];
pt[0] = joint1.position;
pt[1] = joint2.position;

g_DepthGenerator.ConvertRealWorldToProjective(2, pt, pt);
glVertex3i(pt[0].X, pt[0].Y, 0);
glVertex3i(pt[1].X, pt[1].Y, 0);

Thus, we added the following code:

if(eJoint1 == XN_SKEL_TORSO){

printf("Torso Position in XY: %f,%f \n",pt[0].X,pt[0].Y);
}

if(eJoint2 == XN_SKEL_TORSO){

printf("Torso Position in XY: %f,%f \n",pt[1].X,pt[1].Y);
}

This code waits until it sees data for the GCOM, and then prints the appropriate x and y coordinates to the terminal.  Thus, we have found out how to track the x and y coordinates of the GCOM of a human being!  

Some results are below:


So, we're 2/3 of the way there.  All that's left to accomplish our goal is to figure out how to pull the z data for the GCOM.

And we're close.  So far, we have working code for finding the z component of the exact center of the Kinect's view range.  Now, the only necessary step is instead of having that code find the z data for a fixed point, we need to figure out how to feed it the x and y data for the GCOM we are already pulling, and have it calculate the z position for the point at that x and y intersection.  Its late, and we're hitting a bit of the wall, but we are confident that after a bit of sleep, we can figure it out.

All in all it was a good day, and we're happy with the results we got.  We are still on track with our goals.

Friday, April 8, 2011

Initial Success!

After several hours in Detkin Lab, we have reached our first milestone!  The Kinect is sending its data over USB to our laptops, and our laptop is generating a graphical representation of what the Kinect sees.

Initially, we were using the instructions on this website to compile and enable OpenNI, an open-source Kinect Library.  Thanks go to Jeff and Eric for showing us this website.  OpenNI is great, but the instructions on this website were more geared towards running OpenNI on a computer.  Matt found a website with instructions that are more Linux friendly.  We followed these, and were able to get OpenNI installed and running on each of our laptops.  Below are results from two of the Sample programs included in the OpenNI library.

Below is an example from Sample-NIUserTracker.  This program creates a "stick figure" image of the person, which is great for tracking appendage movement, and the movement of the center of mass of the person (as indicated by an X on the torso).  Below is Tim doing his best Captain Morgan:


Below is an example from Sample-PointViewer.  This program handles both depth mapping and image tracking.  Specifically, the program begins by having the user shake one of their hands vigorously.  Then, the program tracks the person's hand, drawing a line that follows its movement.  Below is Matt drawing a circle with his hand:

We will spend the rest of this weekend working to modify the code to suit our needs.

Hello World

We are sleepy